Are you wondering how to install & configure WP Rocket with recommended settings to get the fastest loading website? Then you are at the right place, as I am going to share the ideal WP Rocket Settings in 2021.
Out of many WordPress cache plugins, if you opt for WP Rocket to make your WordPress site load faster, then you made the best thing for your website. Without any doubt, they are dominating many Facebook polls as the #1 cache plugin for a website.
Personally, I am using the combination of WP Rocket & SiteGround SuperCacher technology to get 100/100 GTMterix score and also 100/100 in Google Pagespeed Insights. But undoubtedly, WP Rocket settings are more responsible to speed up your website.
WP Rocket Spring Sale 2021 is going on now. If you want to save 20% on your WP Rocket purchase then this is the best time to buy WP Rocket Plugin. For more details Click This Link.
Table of Contents
Why WP Rocket Is The Best Cache Plugin For WordPress?

I have shared a list of best WordPress cache plugins for bloggers in 2021. I have included few of the popular cache plugins like Swift performance (a tough competitor of WP Rocket), W3 Total Cache, WP Super Cache etc. But, the kind of performance and speed one can get using WP Rocket is simply amazing.
Now let’s proceed and try to find out few common questions people ask for.
- Is it better than WP Super Cache or W3 Total cache?
- Is WP-Rocket pricing justified?
In many Facebook Groups, people have conducted polls to find out the best Cache plugin for WordPress. Let me share one of them so that you can understand the popularity of this plugin.
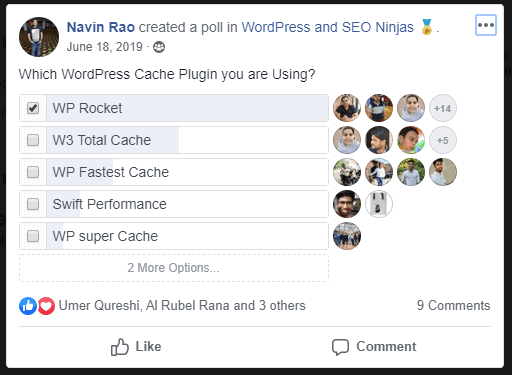
So, let’s explore some of the key features for which WP Rocket has been nominated as the #1 caching Plugin for WordPress websites.
- Speed: When you install an additional plugin it always put a load on website speed. WP Rocket as a plugin is very much light and also all the WP Rocket settings will help you to improve your website speed significantly compared to all the other cache plugins.
- Simple Interface: Every cache plugin has a very long settings option as you need to handle various things. It’s not like just enabling cache and that’s it. In that case also, WP Rocket has created such an easy to understand interface that one can easily understand what needs to enable and what is the importance.
- Multiple Functions: This is not only a cache plugin, this plugin will provide more benefits. E.g. with this plugin you can do database optimization also without installing a new plugin. Similarly, this plugin comes with LazyLoad features, Image optimization feature as well.
- Support: WP Rocket team working very hard to make their plug worth for their customers. You will hardly face any issues and even though you face, their support team is very much proactive and always help you to fix the issue asap.
- Pricing: This amazing plugin comes with a very cheap price only. Yes, you need pay only $49 for 1 website and if you have budget you can spend more money as well. But trust me, this is a very minimal investment that you must do for your blog.
WP Rocket Spring Sale 2021 is going on now. If you want to save 20% on your WP Rocket purchase then this is the best time to buy WP Rocket Plugin. For more details Click This Link.
How To Install WP Rocket Plugin in WordPress?
First of all, WP Rocket is not a free plugin. Like others, they don’t have a free version to try. So, to enjoy the super speed of WP Rocket, you have to buy WP Rocket first. Let’s start this tutorial and then configure best WP Rocket settings to get the best result.
Step 1: Buy WP Rocket Plugin License
Step 1: So, use this link to visit official website of WP Rocket. Occasionally they do offer some discount in a year. Although you will not find any WP Rocket Coupon Code. Rather they offer promotional offers. E.g. right now WP Rocket Spring sale is going on. Later t hey will be back with WP Rocket Black Friday Deal 2021 where they offer even bigger discount as per historical data.
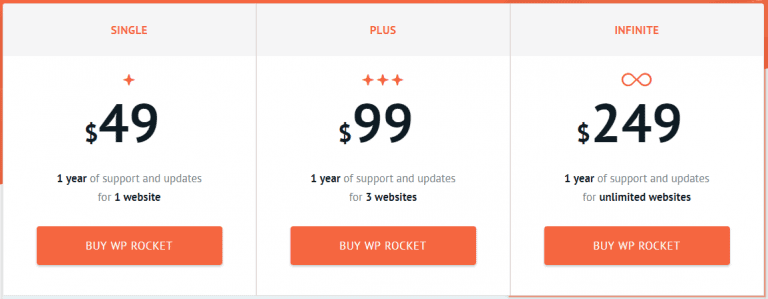
Step 2: Anyway, after visiting WP Rocket website you will find they do have 3 different pricing options. I would recommend you to pick the PLUS plan with 3 websites.
- Single: $49 for one year of support and updates covering use on one website.
- Plus: $99 for one year of support and updates covering use on three websites.
- Infinite: $249 for one year of support and updates covering use on an unlimited number of websites.
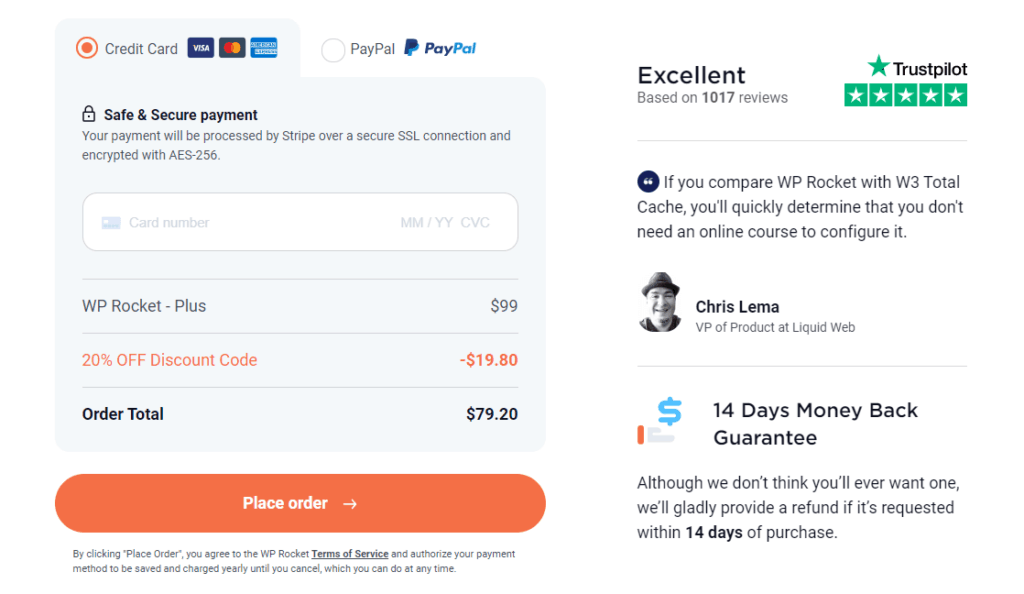
Step 3: Next click on BUY Now button and then provide your personal details. Scroll down and you will find the final amount need to be paid with WP Rocket payment options. This screenshot is taken during WP Rocket Sale 2021.
Step 4: Finish the purchase and then you will get email with user id & password details. After that login to your WP Rocket account and you will find a dashboard like below. You can see the websites where you have installed this plugin.

Next, you need to download WP Rocket plugin from your dashboard area. Just check the left side menu options, you will find a Download Now button.
Step 2: Install & Activate WP Rocket Plugin In Your WordPress
Now login to your website where you want to install WP Rocket Plugin. Go To Plugins=>Add New area and click on Upload Plugin.

Now upload the WP Rocket zip file that you have downloaded from your account. And then install the plugin. Your license part will be automatically taken care as you have downloaded that plugin from your account itself.
As soon as your plugin got installed, Go To Settings=>WP Rocket. And you can see that your license will be updated automatically like below.
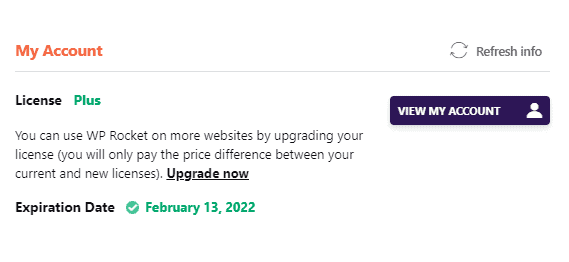
That’s it. Now we are going to set up WP Rocket with all necessary settings so that you can get the best speed of your website.
How To Configure WP Rocket With Recommended Settings?
Let’s go through the detailed WP Rocket Settings to optimize your website. This is a very detailed guide with all possible screenshots provided. If you have further question, then feel free to write a comment below.
1. Dashboard Settings
This is the area where you will find your license information and WP Rocket expiry date.
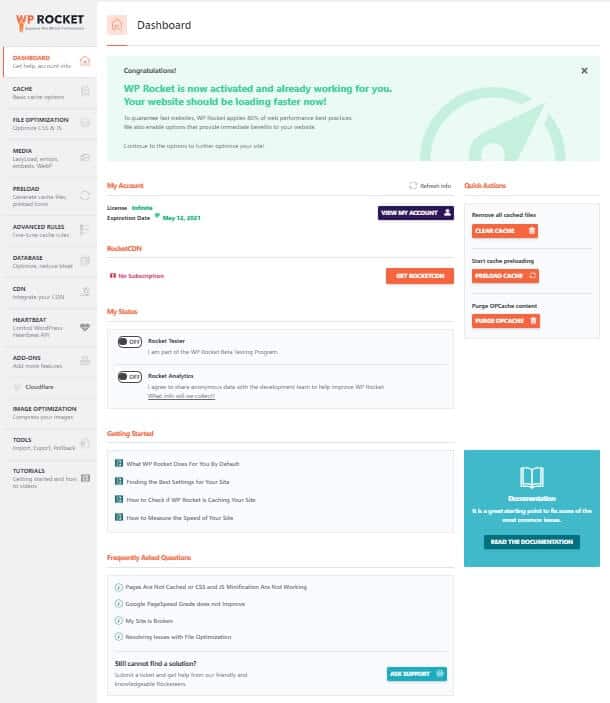
- RocketCDN: This is covered in the CDN part. This is a paid CDN option. If you want free then use Cloudflare CDN.
- My Status: Keep these settings as it was. No need to enable any of these settings.
- Getting Started: You will find video tutorials that you can watch to understand better
- Frequently Asked Questions: If you have questions you can reach out their support team or read the common FAQs first.
2. Cache Settings
In this section of WP Rocket Settings you will handle mobile cache, user cache settings. Let’s explain in detail one by one.
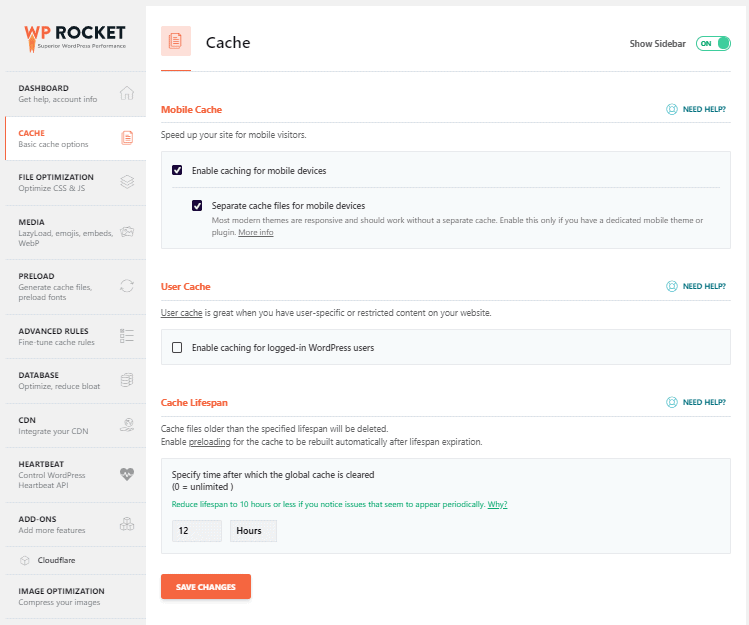
- Mobile Cache: This setting is for them who install separate plugin to handle the mobile version of their website. Most modern themes are responsive and should work without a separate cache. Enable this only if you have a dedicated mobile theme or plugin. More info
- User Cache: User cache is great when you have user-specific or restricted content on your website. This feature for multi user websites like forum or community. You can keep it disabled only.
- Cache Lifespan: I would say don’t change anything here. This settings will decide in how much time your cache will be refreshed. If you have a news website with a very frequent posting schedule then you can set this low. Or else keeping it high for a blog with daily 1 post or even weekly 3-4 post is also good. So, just keep it as it was.
3. File Optimization Settings
Now this is a very crucial settings of WP Rocket. And your website will depend much on these settings. At the same time, if you don’t take these settings seriously they may break your website also. So, let’s configure each of these WP Rocket file optimization settings one by one.
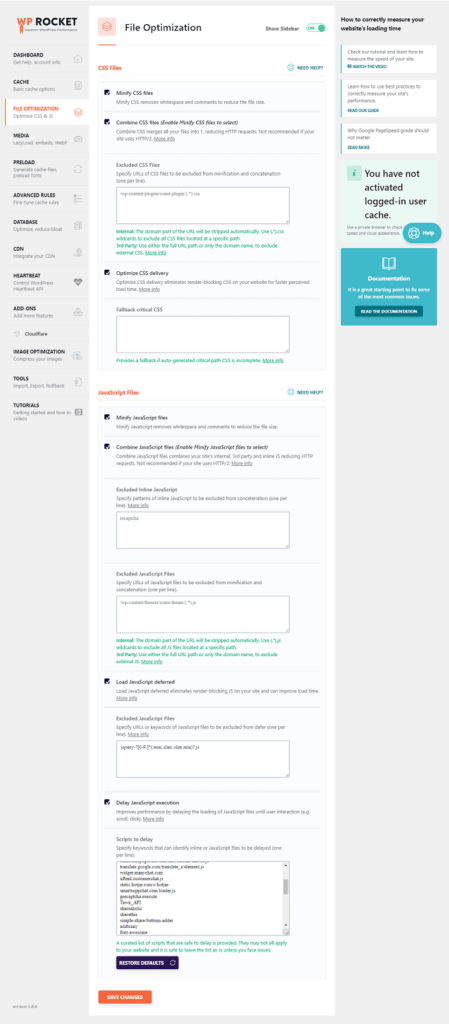
- Minify CSS, Javascript Files: Minify CSS/JavaScript removes whitespace and comments to reduce the file size. Enable this settings and then test your website simultaneously. Because sometimes if you website is designed with Page Builders or Theme builder, the design can break.
- Combine CSS,Javascript Files: This is also a similar settings. Technically it will combine all your CSS/JavaScript files and make them a single file internally so that website speed can be improved. Not recommended if your site uses HTTP/2. More info
- Exclude CSS/JavaScript Files: In case you face any problem with above 2 settings, but want to exclude some CSS/JavaScript file then you can use this settings. Specify URLs of CSS files to be excluded from minification and concatenation (one per line).
- Optimize CSS Delivery: Optimize CSS delivery eliminates render-blocking CSS on your website for faster perceived load time. WP Rocket says: “By enabling these options you may see an improvement in your performance grade on GTmetrix, Pingdom Tools, and Google PageSpeed Insights. Results will vary from site to site. Always remember to test the effect on the speed of your site. “
- Load JavaScript Deferred: Tick this settings as this will load JavaScript after the page has finished parsing.
- Delay JavaScript Execution: In every WordPress blog there are many heavy JavaScript files like comments, Gravatars, or sharing buttons etc which impacts your website speed. This WP Rocket Settings will make sure to load them when they needed and this will drastically improve the initial website loading speed.
4. Media
Media is nothing but the images of that website. Now images or videos plays a huge role in page loading. So you must take care of image loading and enable few features which WP Rocket will provide to optimize them. Let’s talk about them.
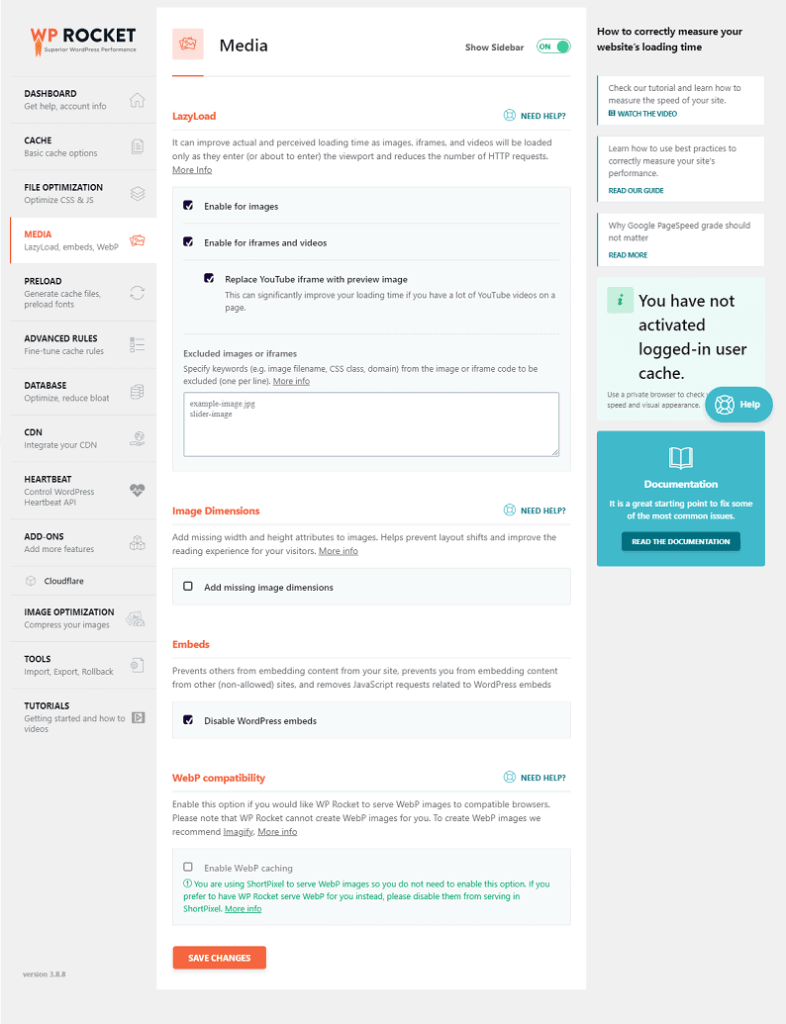
- Lazy Load: This feature is very much essential as it will delays loading of images, iframes, and videos until you scroll down the page and they become visible. You can enable this settings.
- Add Missing Image Dimensions: In case you have not maintained the domensions of your images, then WP Rocket will add missing width + height attributes to HTML images which should fix nearly all specify image dimension errors in speed testing tools.
- Disable WordPress Embeds: Prevents others from embedding content from your site, prevents you from embedding content from other (non-allowed) sites, and removes JavaScript requests related to WordPress embeds. Make it enable.
- WebP Caching: WebP is a modern image format that provides superior lossless and lossy compression for images on the web. Using WebP, webmasters and web developers can create smaller, richer images that make the web faster. WebP lossless images are 26% smaller in size compared to PNGs. So, if you are using any other Image Optimisation plugin like Imagify, ShortPixel then you can leave this settings.
5. Preload
Preloading settings are very much important to reduce GTMatrix errors. Yes, if you want to improve your GTMatrix score then follow this part carefully.
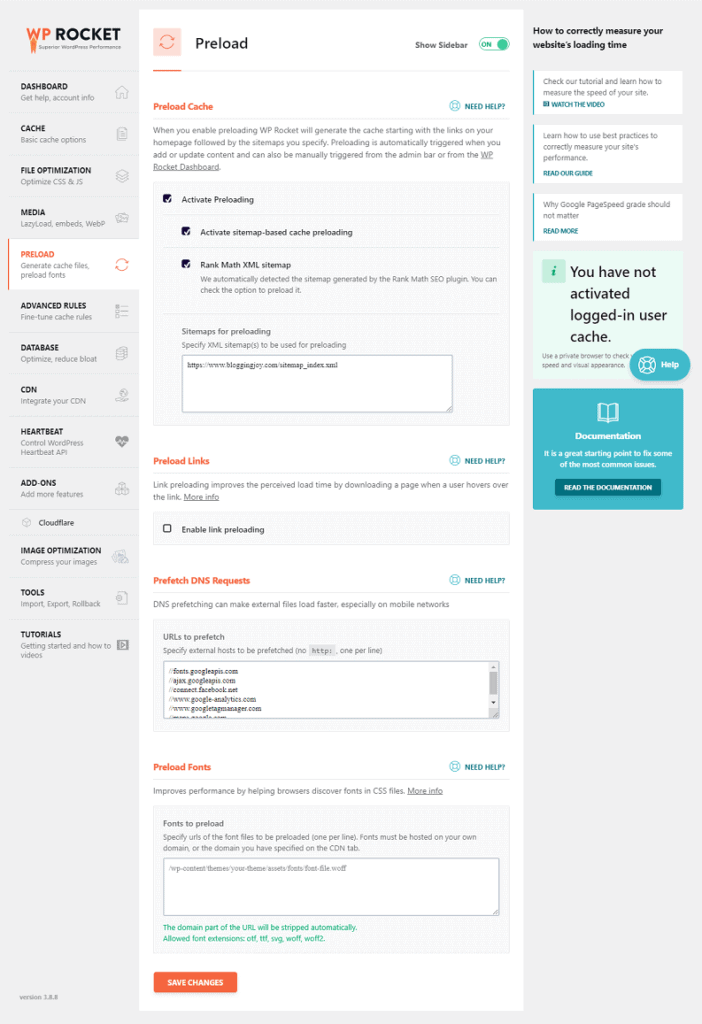
- Preload Cache: Enable all the tick boxes under this option. This will start fetching all resources in advanced so that your website can deliver fast page loading.
- Preload Links: Link preloading improves the perceived load time by downloading a page when a user hovers over the link. With this feature, if you hover over any link before clicking, in the backend that page will start loading so that when user click on that link it will open instantly.
- Prefetch DNS Requests: Here you can mention all the third party sites for which you are getting GTMatrix error under Reduce DNS Lookups section in your YSlow report. Mostly the links will be from Google Fonts to Google Analytics, Maps, ASense, Tag Manager, YouTube, or even social media platforms etc.
//maps.googleapis.com
//maps.gstatic.com
//fonts.googleapis.com
//fonts.gstatic.com
//use.fontawesome.com
//ajax.googleapis.com
//apis.google.com
//google-analytics.com
//www.google-analytics.com
//ssl.google-analytics.com
//www.googletagmanager.com
//www.googletagservices.com
//googleads.g.doubleclick.net
//adservice.google.com
//pagead2.googlesyndication.com
//tpc.googlesyndication.com
//youtube.com
//i.ytimg.com
//player.vimeo.com
//api.pinterest.com
//assets.pinterest.com
//connect.facebook.net
//platform.twitter.com
//syndication.twitter.com
//platform.instagram.com
//referrer.disqus.com
//c.disquscdn.com
//cdnjs.cloudflare.com
//cdn.ampproject.org
//pixel.wp.com
//disqus.com
//s.gravatar.com
//0.gravatar.com
//2.gravatar.com
//1.gravatar.com
//sitename.disqus.com
//s7.addthis.com
//platform.linkedin.com
//w.sharethis.com
//s0.wp.com
//s1.wp.com
//s2.wp.com
//stats.wp.com
//ajax.microsoft.com
//ajax.aspnetcdn.com
//s3.amazonaws.com
//code.jquery.com
//stackpath.bootstrapcdn.com
//github.githubassets.com
//ad.doubleclick.net
//stats.g.doubleclick.net
//cm.g.doubleclick.net
//stats.buysellads.com
//s3.buysellads.com
Source: onlinemediamasters.com
Preload Fonts: Similarly if you are using any external fonts like Google fonts, then you will get similar messages in GTMatrix. Copy your font files from GTmetrix Waterfall (they have a tab for font files) and paste them in WP Rocket’s preload fonts field. This will improve the GTMatrix score and also speed up your website.
6. Advanced Rules
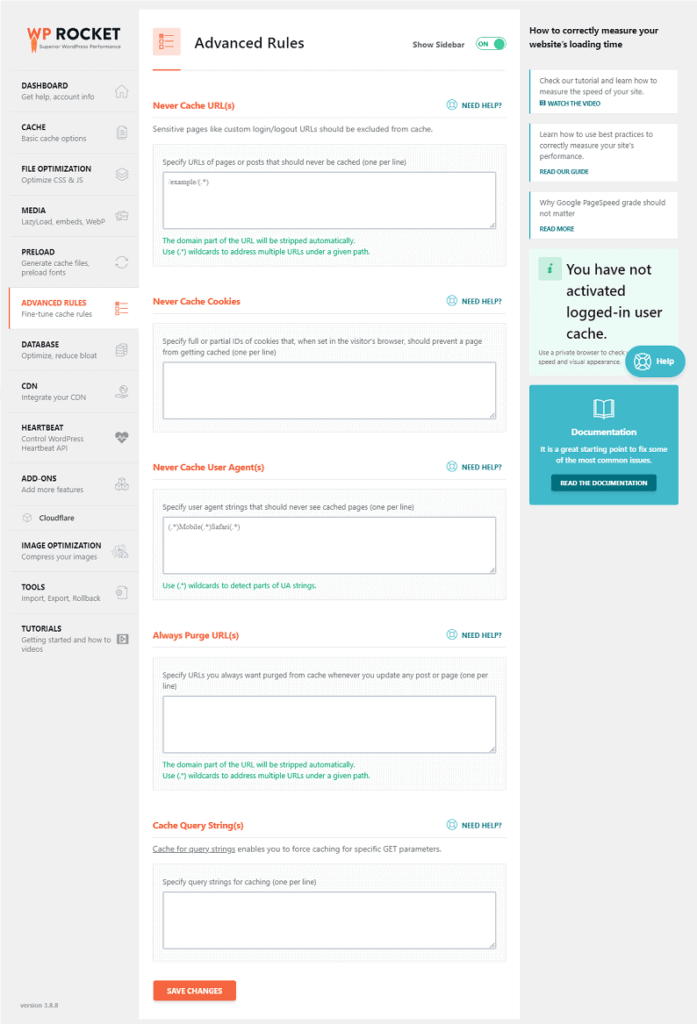
If you are running an online store or eCommerce store on your website or using any WooCommerce plugin then this settings will help you. WP Rocket has documentation for that, which is self explanatory.
7. Database
This WP Rocket Settings is one of my favorite one. Mostly people using free WordPress cache plugin use Auto-Optimize or WP Optimize plugin to optimize their database. But WP Rocket provides the same feature in their plugin which will automatically take care of your database. Let me share what you can do with this settings.
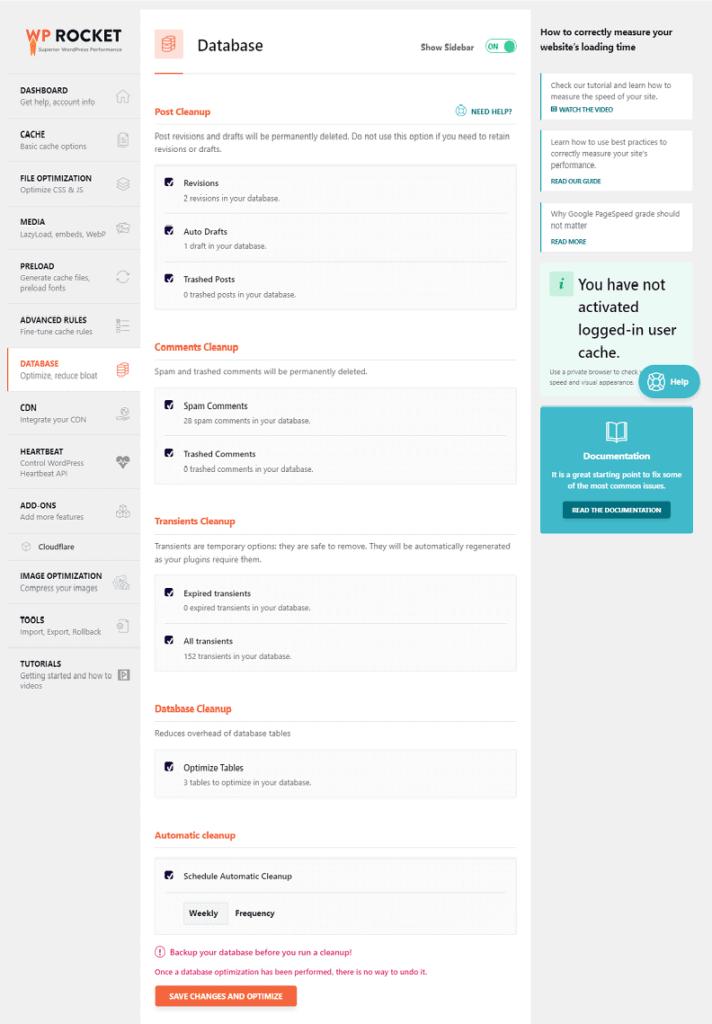
- Revisions – old versions of your posts which are saved when you hit “Publish.”
- Auto Drafts – automatically saved versions of your post if you don’t hit “Publish.”
- Trashed Posts – posts and drafts you deleted.
- Spam Comments – comments marked as spam.
- Trashed Comments – comments marked as trash.
- Expired Transients – transients that have expired and are still in your database.
- All Transients – stores data that takes a long time to retrieve (eg. social counts on blogs).
- Optimize Tables – optimizes database tables to run more efficiently.
- Automatic Cleanup – how often you want WP Rocket to clean your database.
8. WP Rocket CDN Settings
If you have a website targeting global traffic, then you must use CDN. This will help to create various copies of your website on different country specific servers / data centers so that your website can load faster from any country. As a beginner, you can start with Cloudflare Free CDN, but if you want to more features & data centers then you need to go for BunnyCDN or RocketCDN.
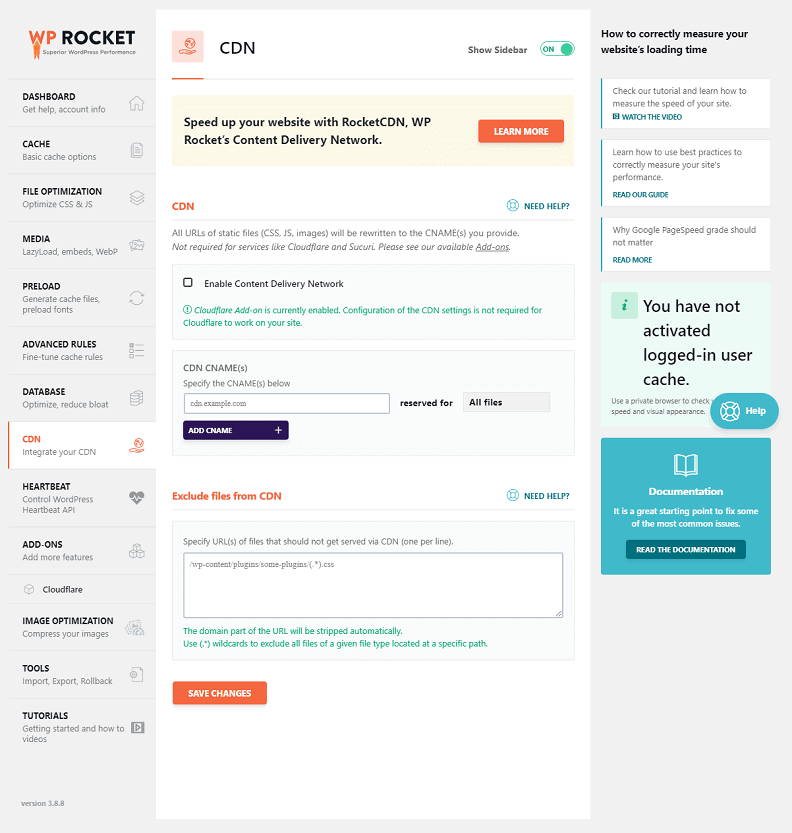
Whatever CDN services you use, using this settings you can connect with your CDN account and improve your website speed. This is little complicated settings and I am going to cover that in a different tutorial. But right now, you can leave that blank.
9. Heartbeat Settings Of WP Rocket
The Heartbeat API is a simple server polling API built in to WordPress, allowing near-real-time frontend updates. Again, this will consume your resources and impact on your website speed. TO disable heartbeat API, there is a plugin: Heartbeat Control plugin. But with WP Rocket, you don’t need to install that, as it’s an in-built feature of WP Rocket only. Just enable the WP Rocket heartbeat settings and stay relaxed.

10. WP Rocket Add-Ons
If you’re using any of these services, activate it’s add-on. This is self explanatory settings only. E.g. If you want to set up Sucuri or Cloudflare extensively then enable them and do the settings for them. I will better create a separate tutorial to cover these 2 settings.
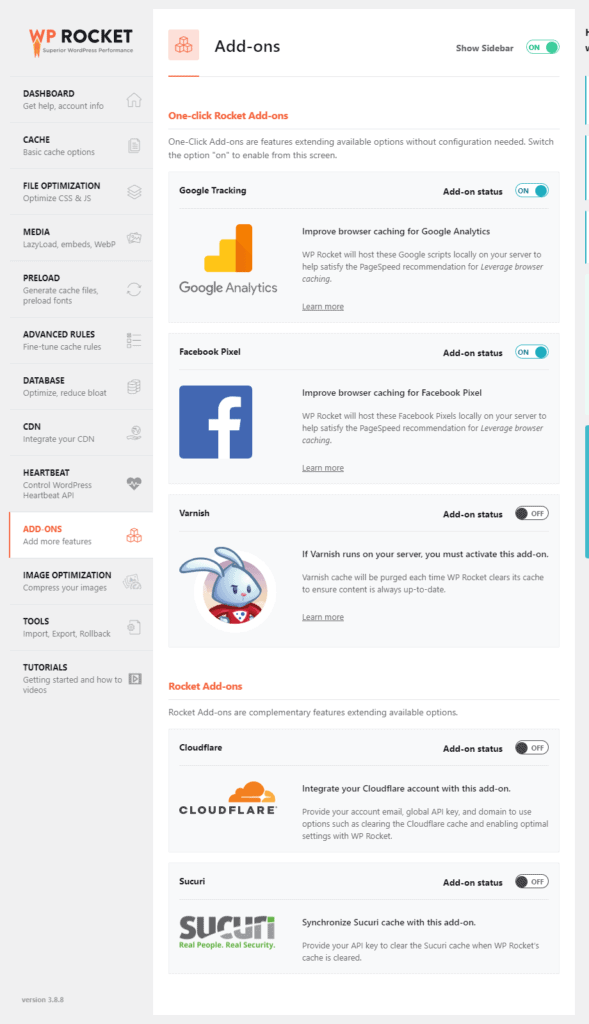
Besides that, again to handle few GTMatrix errors like “leverage browser caching” issue for Google Analytics you can use Google Tracking. Similarly if you are using Facebook Pixel then use that settings.
11. Image Optimization Settings
WP Rocket recommends Imagify because it’s their plugin. But it’s not mandatory. Personally I am using ShortPixel and if you don’t want to spend money then better to compress the images sing any image compression tool before uploading.
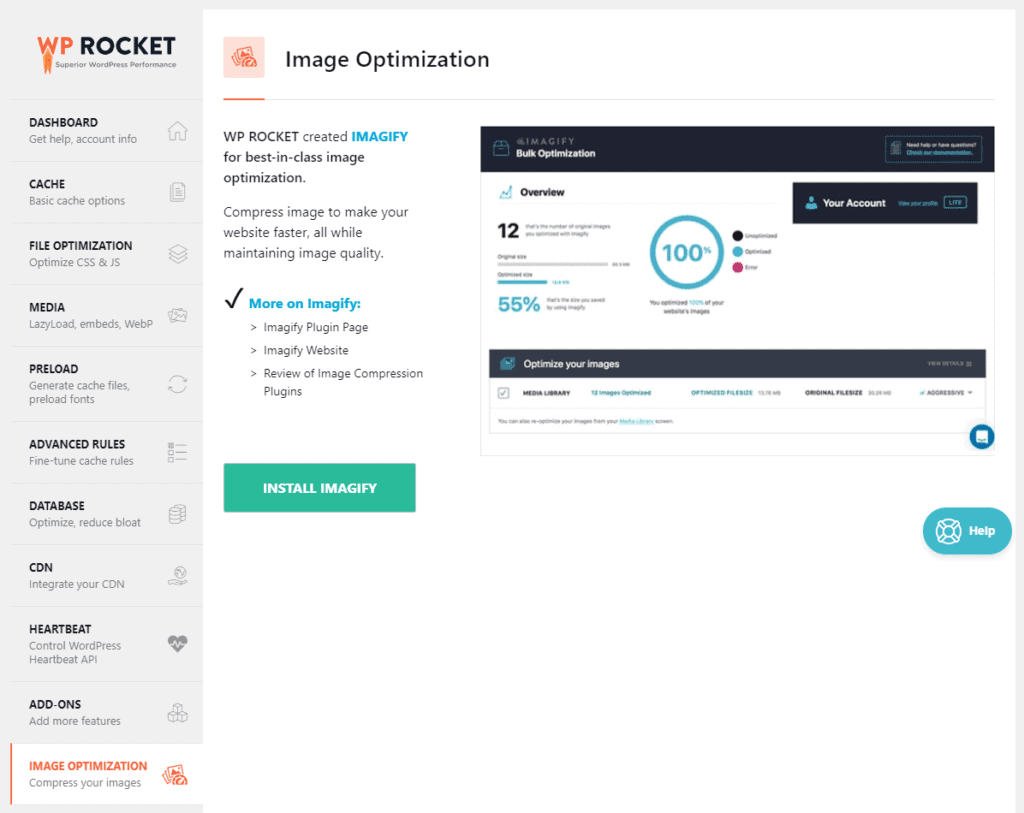
The only thing about TinyPNG is that it doesn’t support WebP in which case you will need a plugin like WebP Converter For Media. In that case, I found ShortPixel as one of the best option.
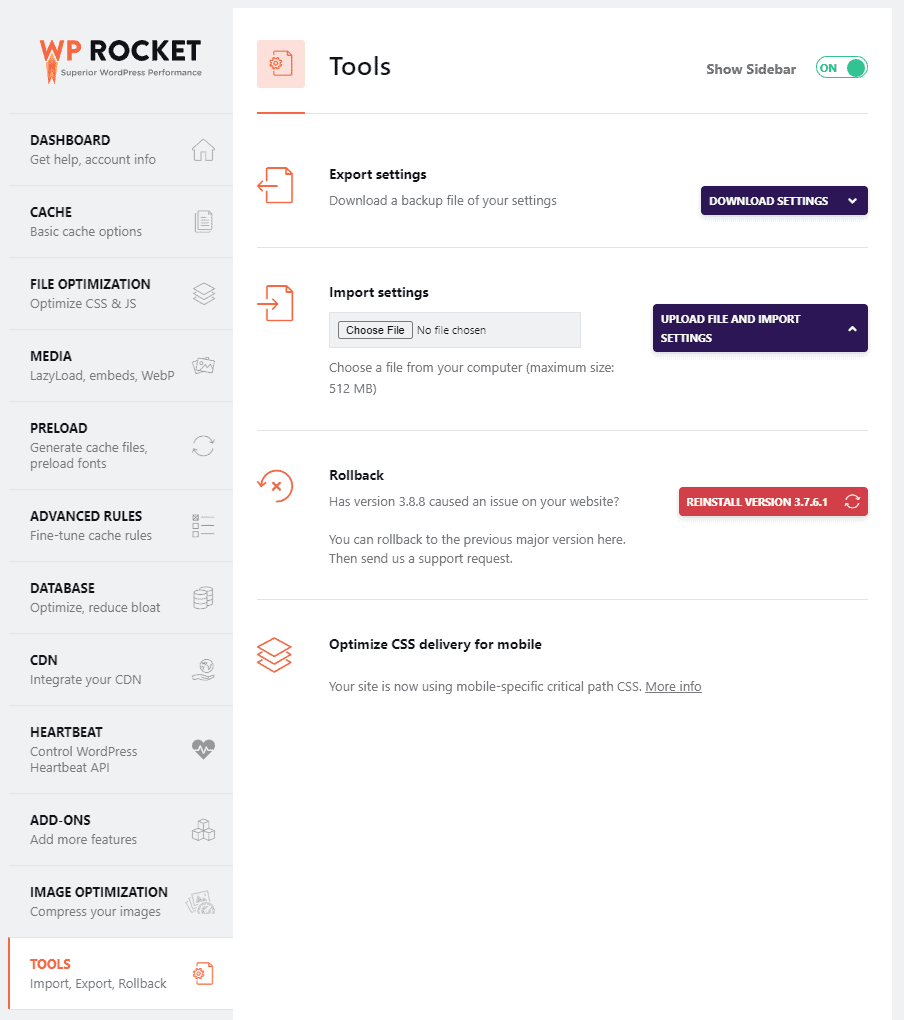
12. Tools
In this area, you can export WP Rocket settings so that you can use the same for other websites, you can import, in case you want to rollback any update that also you can do it. With the last option, you can enable mobile-specific critical path CSS. Just press the button for once and it’s done.
FAQs Related To WP Rocket Settings
What does WP Rocket do?
WP Rocket is a caching and performance optimization plugin to improve the loading speed of WordPress websites. You can install and configure WP Rocket in less than 3 minutes!
What’s the best way to configure WP Rocket?
The most important steps are to test each setting in the file optimization tab, setup a CDN, disable heartbeat, and take advantage of prefetch and preload.
Is WP Rocket free?
No, WP Rocket is not a free plugin and they don’t offer any free trial also. You have to purchase the license and then use.
How do I uninstall WordPress Rocket?
Uninstalling WP Rocket is very easy. Go to your WordPress dashboard, and from there, head off to the plugins section; from there, you can deactivate or even delete your plugins.
Can I use Autoptimize with WP Rocket?
Yes, you can use WP Rocket and Autoptimize at the same time. But it’s not required as WP Rocket has these features in-built.
Do I need WP Rocket?
If you want to speed up your website, WP Rocket is a good choice. There are free WordPress caching plugins available, but with something as important as caching you are going to want access to support, and that is why I would recommend using WP Rocket on your website.
Conclusion: Is WP Rocket The Best Cache Plugin for WordPress?
So, that’s it in this detailed tutorial of WP Rocket settings. I have already shared that WP Rocket is quite popular cache plugin. If you are looking for free cache plugin, then there are various options. But if you want some serious optimization then you have to buy WP Rocket plugin and install on your WordPress website. Hope this tutorial will be helpful and in case you have any doubts, please write a comment below. Thanks for reading & sharing this article.

