Planning to start a blog on GreenGeeks hosting plan? Then you are at the right place as I will be helping you to understand the complete process and also share all the necessary steps to create a website on GreenGeeks from scratch.
GreenGeeks offers very good hosting plans for beginners and also they offer Free Domain Name for 1 year. Let’s find out the key features of GreenGeeks hosting to understand why they are the #1 Best Green Web Hosting Companies.

Table of Contents
Key Features Of GreenGeeks Hosting Plan
GreenGeeks is a fantastic web hosting provider which usually costs $9.95/month, but through a special introductory offer, users can purchase their web hosting service for $2.95/month. GreenGeeks comes with a 30-day money-back guarantee policy and even offers a free domain name.
Some basic features that users will get within GreenGeeks hosting packages
- GreenGeeks offers unlimited bandwidth and unlimited web space.
- It provides several SEO marketing tools.
- They provide robust security features and hence protects the user’s website from DDoS attack.
- It also offers a 1-click WordPress installation feature and also provides regular updates.
- This Hosting provider is PHP7 enabled.
- It offers HTTP/2 enabled network protocol so that users can enjoy faster page loads.
- It provides free CDN and free SSL certificates.
- They offer free nightly backups.
GreenGeeks Hosting Plans: Are They Best Green Hosting?
GreenGeeks offers different types of hosting platforms, including Web hosting, WordPress hosting, Reseller hosting, and VPS hosting. As a beginner, you can start with a shared hosting plan or WordPress hosting plan which is quite cheap and also enough to create a blog in 2020.
Let’s find out the key features of GreenGeeks WordPress hosting plans and what they offer to attract new bloggers.
- Unlimited SSD web space
- Unlimited domains on one account
- Free domain registration
- Free site builder
- Free Let’s Encrypt Wildcard SSL Certificate
- Free unlimited email accounts
- Free CDN integration
- Free nightly backups
- Live support
- Ecommerce-friendly
Keep a track of upcoming GreenGeeks Black Friday Sale 2021 where they are expected to provide the maximum discount of the year. I have also started collecting all popular Web Hosting Deals during Black Friday 2021.
How To Start A WordPress Blog on GreenGeeks Hosting [Step By Step Guide]
In this section of this article, we will highlight all the steps one after the other, following which users will be able to start their blog on GreenGeeks quickly. The very first step is to find out which GreenGeeks hosting plan is best suitable for you blog.
Step #1: Which GreenGeeks Pricing Plan is Best?
GreenGeeks offers various shared hosting or WordPress hosting plans. As I have said, we will consider shared hosting plans only as they are actually best for beginners. So, as per GreenGeeks hosting plans, they offers 3 different types of hosting with different buying options.
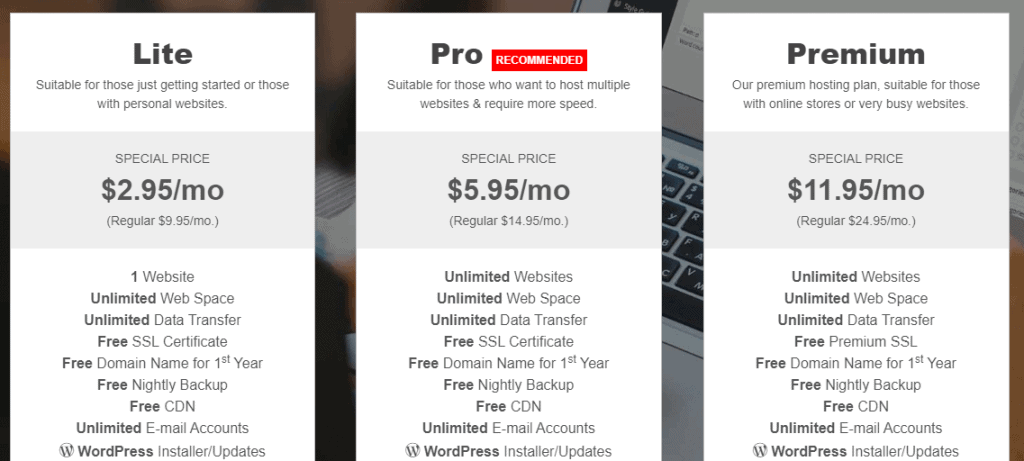
| GreenGeeks Pricing | Ecosite Lite | Ecosite Pro | Ecosite Premium |
| Regular Monthly Rate | $9.95 | $14.95 | $24.95 |
| 12 Months Term | $4.95* | $7.95* | $13.95* |
| 24 Months Term | $3.95* | $6.95* | $12.95* |
| 36 Months Term | $2.95* | $5.95* | $11.95* |
- EcoSite LITE: Perfect for small websites or blogs that are just getting started.
- EcoSite PRO: Great for growing websites that need more speed and resources.
- EcoSite PREMIUM: Our small business plan is perfect for very busy websites or online stores.
So, the best plan to start a blog on GreenGeeks hosting is the ECO Lite Plan for 36 months as you can avail the cheapest GreenGeeks Coupon Discount Price of $2.95/mo with a Free Domain name.
Step #2: GRAB Free Domain With GreenGeeks Hosting
GreenGeeks offers FREE Domain name for 1st year. You can buy your preferred domain name with your desired extension. But I always recommend to buy a domain name with .com extension only. If not found then look for others.
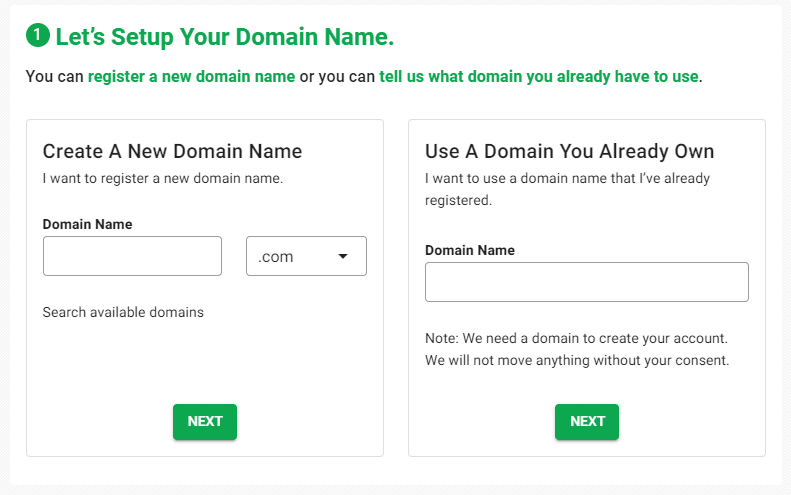
Remember These Domain name Buying Tips.
This is an essential step in which users need to choose an appropriate domain name. A domain name is a unique identifier for a website. But before going for a particular domain name, users must keep two points in mind, which we are going to discuss below.
- Firstly users must make sure that the domain name should be related to the content that they will be blogging about. Since by doing so, users will be able to tell their potential visitors what their blog is all about.
- Secondly, users must also try to keep short and simple domain names so that the visitors can easily remember them.
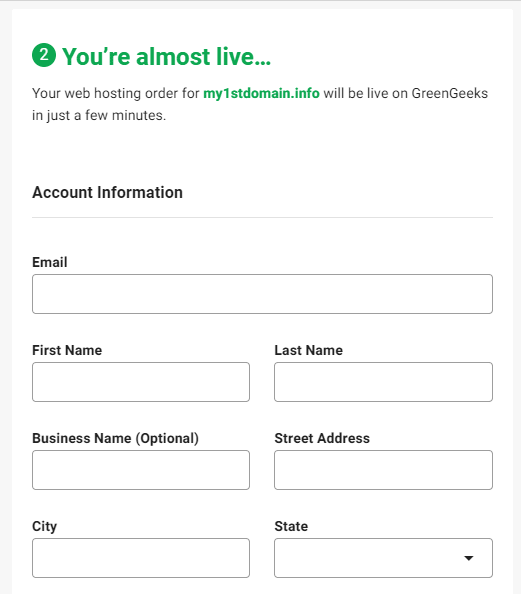
Step #3: Provide All Personal Information
Next you have to provide all your personal details like name, email address, mobile number etc so that you will get all the necessary details from GreenGeeks as soon as you purchase hosting from them.
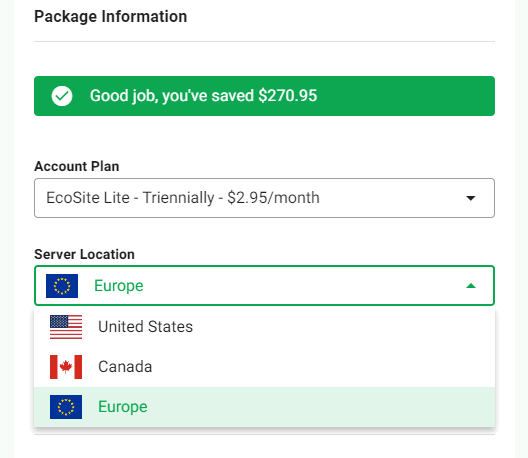
Step #4: Choose Right GreenGeeks Data Center
GreenGeeks offer 3 data centers: USA, Canada & Europe. So as per your website traffic you can choose the correct data center. E.g. if you are planning to get traffic from USA then make sure to pick the USA Data center. This way your website will load fast in USA. For any other countries, you can pick the nearest data center and set up FREE CDN Services so that your website can load faster in any country.
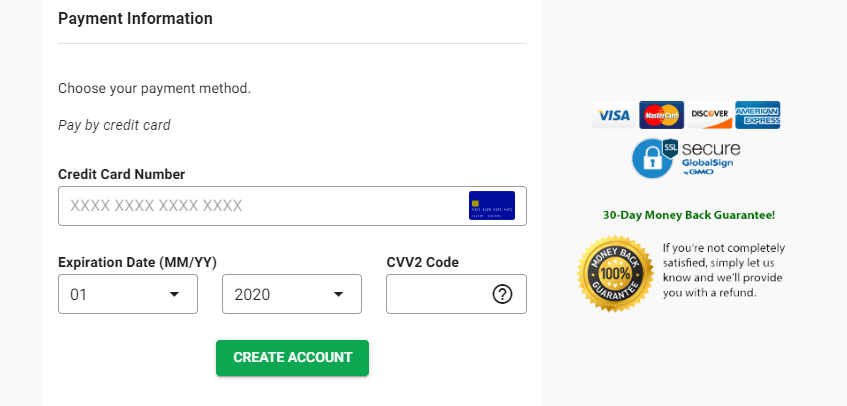
Step #5: Provide GreenGeeks Payment Option
GreenGeeks accepts only credit card payment. So, make sure to provide your credit card details and complete the payment. You will also get a 30 day money back guarantee.
After applying the GreenGeeks discount, your final cart will look like below. With the 36 month hosting plan, you can actually save a huge amount of money. Just calculate how much you will pay every year in you buy this GreenGeeks offer.
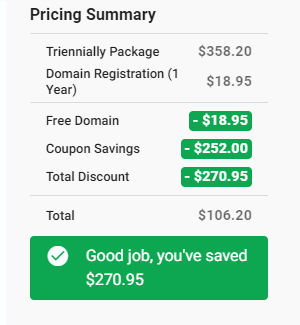
Remember, if you go for 1 year or less time then you have pay a higher GreenGeeks renewal FEE from 2nd year onward. So the best way to save huge on GreenGeeks hosting is by choosing the 36 month plan only.
So, activate this GreenGeeks discount now.
Step #6: How To Install WordPress On GreenGeeks Hosting
This is the final step where users need to install WordPress, a content management system that is used by over 60 million websites. It is straightforward to install WordPress so users will be able to install it easily, even if they are doing it for the first time.
However, if someone finds it difficult to install WordPress, then he/she must go through the steps that we are going to discuss below.
- First and foremost, users need to click on the option “Client Login.” As users will click on the “Client login” option, they will find two login screens.
- Within the first login screen, users need to enter their email id and password, and then finally, they need to click on the “Login to Account Manager” option.
- Once users click on the “Login to Account Manager” option, they will be directed to the Account Manager Webpage from where they need to click on the “cPanel Login” option.
- In this step, within the cPanel Account, users need to search for Softaculous using the cPanel search feature, and then they need to click on the Softaculous icon once it appears.
- On entering Softaculous, users need to search for the WordPress menu and eventually enter within the WordPress menu by click on it.
- After entering the WordPress menu, users need to enter certain details like “Choose Protocol,” “Choose Domain,” “Database Name,” “Site Name,” and “Site Description.”
- After entering the above-mentioned information, users need to enter a unique “Admin Username” and a strong “Admin Password.”
- Finally, after entering all the details, users need to click on the “Install” button present at the bottom of the current window.
So, this is the end of this detailed guide on how to set up a WordPress blog on GreenGeeks hosting. As soon as you are done with WordPress installation, you can read the below 3 articles to complete the remaining settings on your WordPress blog.
- 20 Essential Settings To Do After Installing WordPress on Your Domain
- List Of Necessary Plugins To Install On Your Blog
- 10 Best WordPress Themes To Create A Fast Loading Website In 2020
Conclusion: Is GreenGeeks Hosting Worth?
As promised at the beginning of this article, we have shown all the steps to quickly start a blog on GreenGeeks. So all readers who are planning to start a new blog on GreenGeeks must thoroughly go through all the steps mentioned above.
GreenGeeks is comparatively a new hosting company. Their plans looks very cheap, have plenty of amazing premium features which attracts the beginners and on top of that they offers Green Web Hosting plans. As a beginner, you will find GreenGeeks as a good SiteGround Alternative or Bluehost Alternative hosting for USA servers. Feel free to ask anything if you are starting a blog on GreenGeeks hosting.

Thanks for sharing in detail. You just cleared all my doubts.